Batch processing
Using it, you can process all projects in a folder with a couple of clicks or apply different covers to one project (for example, for a book catalog) or create a command line to process projects in batch mode.
You can find a description of all parameters and macros in the Command Line help.
You can find a description of all parameters and macros in the Command Line help.
- Select Batch Processing... from the Tools menu.
- If you want to create a command line to process the current project, simply configure the necessary parameters in the Command Line group and copy it for later use.
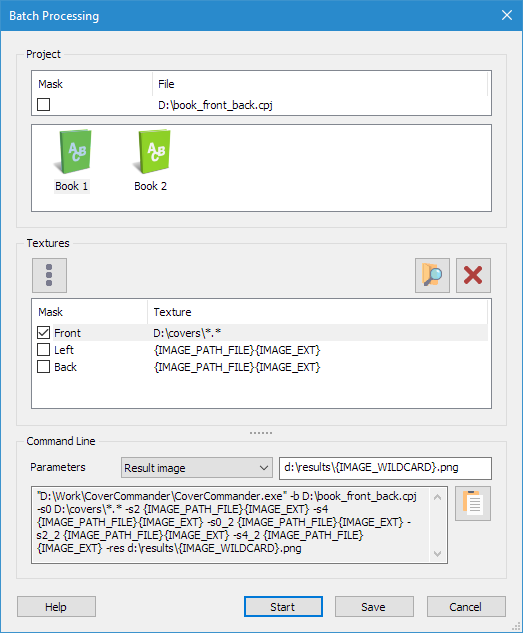
- If you want to process multiple projects, enable the Mask option in the Project group.
If you want to change the mask to process only certain projects in the folder, then double-clicking in the File field will open an editing field.
- If you want to process the current project for different covers, enable the Mask option for the desired texture in the Textures group.
Please note, you can only use a mask for one texture. You can customize the file names for the rest using macros. If you want to change the file names for textures, double-click on the desired field.
- When you change the Mask option, the remaining fields are filled with default values.
For a project: the File field is filled with the file name of the current project, or a mask for all projects in the folder.
For texture: all files in the project folder for the selected texture. If any textures match the selected one, the field is filled with {IMAGE_PATH_FILE}{IMAGE_EXT} macros, which will be replaced with the same file name.
If the project uses different images for each side, then set your own mask and macros for the remaining sides. For example, for a book:
- Front: D:\covers\*_front.*
- Left: {IMAGE_PATH_WILDCARD}_left{IMAGE_EXT}
- Back: {IMAGE_PATH_WILDCARD}_back{IMAGE_EXT}
- The Macros button allows you to insert the desired macro into the File field. Before doing this, select the texture and, if necessary, the insertion location in the edit field.
- The Browse button allows you to select a folder if the Mask option or a specific image for other textures is enabled.
- The Clear button allows you to delete the assigned texture.
- The Parameters list allows you to change project settings, regardless of the values saved in it.
- The Command Line field displays the generated command line, which you can copy for further use. To do this, click on the Copy to clipboard button.
- The Start button will start batch processing with the selected parameters.
- The Save button allows you to save the batch processing settings without starting the process itself if you do not need it at the moment.
Related topics
Cover Commander