Customizing project
Although you may use the easy New Project Wizard to create a
new project, you may still want to customize some or all of the
project settings. 3D Text Commander shows project settings grouped in
a number of tabs in the main window. Let's take a closer look at each tab:
On this tab, you can set and modify the general properties - text message and style.
Background - sets the canvas background color.
Text - this group of settings defines text message, line spacing, and alignment:
Font - this group of settings defines font face, style and weight.
 The text above must be selected in order to apply changes.
Texture - this group of settings defines font color and texture.
The text above must be selected in order to apply changes.
With this group of settings, you can manage the dimensions, rotation and position of the 3D text.
Presets - predefined transformation settings. You can use the default or create your own presets.
To select a preset, click on the down arrow in the Presets group and then select the desired preset on the list that appears. If a different preset was applied to the image, the program will ask whether you really want to apply the new preset.
To save current settings as a new preset, click on the Save... button and then enter the preset name in the New Preset window that appears.
Choose new preset names carefully.
If the preset name you are attempting to save your settings as already
exists, the program will overwrite it silently.
The following shadow preferences can be modified:
To change parameter, drag the corresponding scrollbar elevator until the desired value is reached. You can also set the desired values in the corresponding fields directly.
To reset parameter to default value, click the corresponding label.
To delete a preset from the presets list, click on the Delete button and then Yes in the confirmation prompt that appears.
You can see the instant text preview in the Project Preview frame on the right of the window. You can rotate the preview by grabbing the image with the mouse and moving it to any direction.
This group of settings defines the camera preferences, which include rotation, zoom, and perspective. These preferences can be saved as presets, which can be loaded and managed right within this tab.
Presets - predefined camera settings. You can use the default or create your own camera presets.
The following camera preferences can be modified:
You can see the instant text preview in the Project Preview frame on the right of the window. You can rotate the preview by grabbing the image with the mouse and moving it to any direction.
This group of settings defines the light preferences, which include vertical and horizontal rotation and distance. There are three light sources available: Global light, First light, and Second light. The first and the second light source can be switched on or off. The global light is always on. Each light source has its own set of preferences. These preferences can be saved as presets, which can be loaded and managed within this tab.
Presets - predefined light settings. You can use the default or create your own light presets.
The following light preferences can be modified:
You can see the instant text preview in the Project Preview frame on the right of the window. You can rotate the preview by grabbing the image with the mouse and moving it to any direction.
This group of settings defines the shadow preferences, which include direction, length, intensity, opacity, blur, and gradient. The shadow can be hidden or shown. The shadow preferences can be saved as presets, which can be loaded and managed within this tab.
Presets - predefined shadow settings. You can use the default or create your own shadow presets.
The following shadow preferences can be modified:
You can see the instant text preview in the Project Preview frame on the right of the window. You can rotate the preview by grabbing the image with the mouse and moving it to any direction.
This group of settings defines the reflection preferences, including intensity and opacity. The reflection can be hidden or shown. The reflection preferences can be saved as presets, which can be loaded and managed within this tab.
Presets - predefined reflection settings. You can use the default or create your own reflection presets.
The following reflection preferences can be modified:
You can see the instant text preview in the Project Preview frame on the right of the window. You can rotate the preview by grabbing the image with the mouse and moving it to any direction.
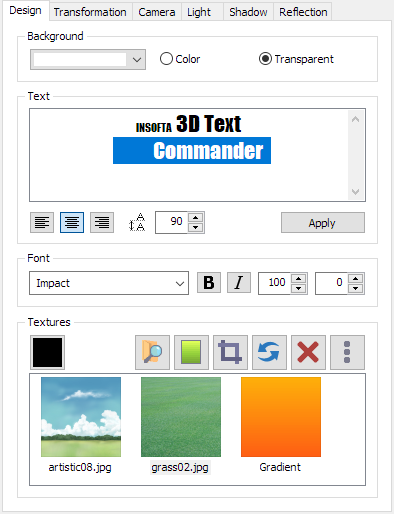
Design
On this tab, you can set and modify the general properties - text message and style.
Background - sets the canvas background color.
- To set the canvas
background color, first choose whether you want to use the Transparent
or Color background by clicking on the corresponding radio option.
- Then, for the color option, click on the down arrow by the color button and choose the color to be used on the palette that appears. If you do not see a desired color on the palette, click on the More Colors... button in the Color window.
Text - this group of settings defines text message, line spacing, and alignment:
- Message - The edit box displays the default banner message. To replace it with your own message, enter the text to be shown on your 3D banner in the edit box.
Please note that both single and multiple lines are allowed; to insert a line-feed simply hit on the Enter key on your keyboard.
- Alignment - To center the text or align it to the left or to the right, click on the corresponding alignment button below the text edit box.
- Line Spacing - The number indicates current line spacing value. To cut the space between the lines, enter a smaller value in the line spacing field below the text edit box. To add more space between the lines, enter a greater value in the same box.
- Apply - Although Commander automatically updates the resulting image as you modify project settings, you can force the update by clicking on the Apply button at the bottom of the Text group.
Font - this group of settings defines font face, style and weight.
The text above must be selected in order to apply changes.
- Font Face - Change the current font face by pulling down the list of available fonts and selecting the font to be set for your 3D banner.
- Italic - To italicize your text message, tick off the Italic option in the Text group.
- Bold - To toggle font weight between Normal and Bold, clear or select, respectively, the Bold option in the Text group.
- Size - Allows you to change the relative size of the selected text.
- Vertical Offset - Allows you to change the relative vertical position of the selected text.
Texture - this group of settings defines font color and texture.
The text above must be selected in order to apply changes.
- Color - sets color for the front side that will have no image.
Click on the color button and choose the color to be used on the palette that appears.
If you do not see a desired color on the palette, click on the
More Colors... button in the Color window.
- Image - set the front side image. To set a image, click on the Browse... button. When you click on the Menu button, you will get the menu for working with textures. You can open the texture from the Recent Images menus. Textures cab be transformed. They can be cropped, rotated and flipped.
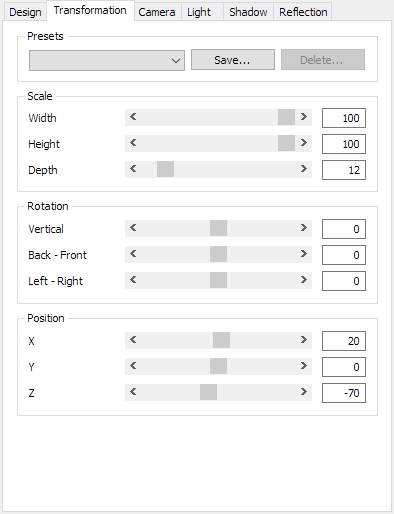
Transformation
With this group of settings, you can manage the dimensions, rotation and position of the 3D text.
Presets - predefined transformation settings. You can use the default or create your own presets.
To select a preset, click on the down arrow in the Presets group and then select the desired preset on the list that appears. If a different preset was applied to the image, the program will ask whether you really want to apply the new preset.
To save current settings as a new preset, click on the Save... button and then enter the preset name in the New Preset window that appears.
Choose new preset names carefully.
If the preset name you are attempting to save your settings as already
exists, the program will overwrite it silently.
The following shadow preferences can be modified:
- Scale - with this group of settings, you can manage the dimensions and side ratios of the 3D text, shrinking or expanding it by Width, Height and Depth.
All the dimensions are given in percentile.
- Rotation, Position - you can manage rotation and position of the 3D text.
To change parameter, drag the corresponding scrollbar elevator until the desired value is reached. You can also set the desired values in the corresponding fields directly.
To reset parameter to default value, click the corresponding label.
To delete a preset from the presets list, click on the Delete button and then Yes in the confirmation prompt that appears.
You can see the instant text preview in the Project Preview frame on the right of the window. You can rotate the preview by grabbing the image with the mouse and moving it to any direction.
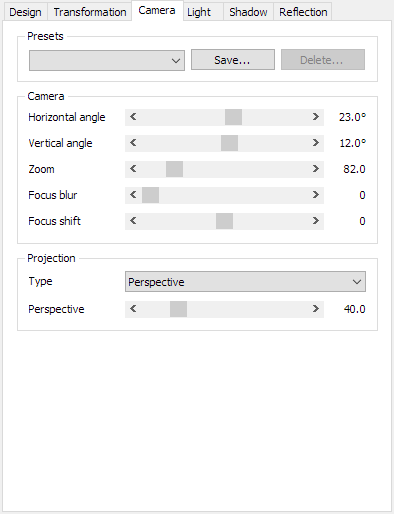
Camera
This group of settings defines the camera preferences, which include rotation, zoom, and perspective. These preferences can be saved as presets, which can be loaded and managed right within this tab.
Presets - predefined camera settings. You can use the default or create your own camera presets.
The following camera preferences can be modified:
- Horizontal rotation - rotates image horizontally.
- Vertical rotation - rotates image vertically.
- Zoom - zooms in or zooms out on the text.
- Focus blur, Focus shift - depth of field settings.
- Projection - type of the projection: perspective or orthographic.
- Perspective - sets the text look as if it was looked at from the top and down or from the bottom and up.
You can see the instant text preview in the Project Preview frame on the right of the window. You can rotate the preview by grabbing the image with the mouse and moving it to any direction.
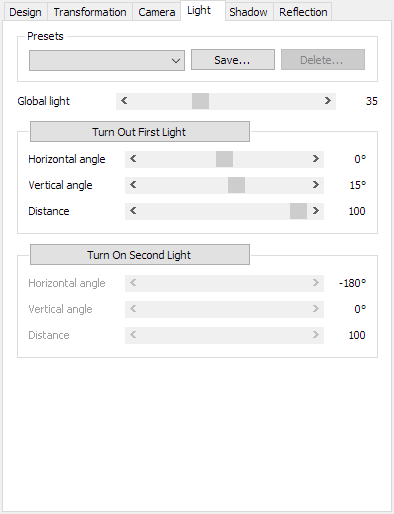
Light
This group of settings defines the light preferences, which include vertical and horizontal rotation and distance. There are three light sources available: Global light, First light, and Second light. The first and the second light source can be switched on or off. The global light is always on. Each light source has its own set of preferences. These preferences can be saved as presets, which can be loaded and managed within this tab.
Presets - predefined light settings. You can use the default or create your own light presets.
The following light preferences can be modified:
- Global light - sets global light intensity.
- Turn off/on first light - turns off or turns on the first light source.
- Turn off/on second light - turns off or turns on the second light source.
- Horizontal rotation - rotates the corresponding light source horizontally.
- Vertical rotation - rotates the corresponding light source vertically.
- Distance - sets distance from the corresponding light source to object.
You can see the instant text preview in the Project Preview frame on the right of the window. You can rotate the preview by grabbing the image with the mouse and moving it to any direction.
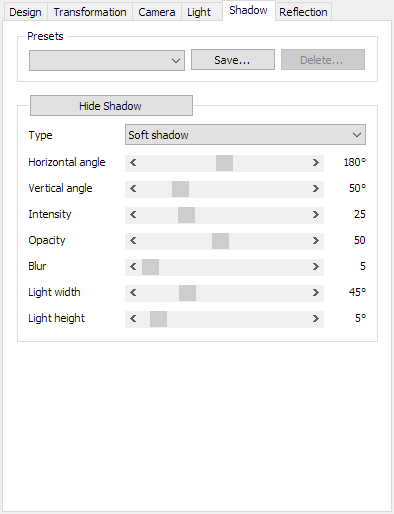
Shadow
This group of settings defines the shadow preferences, which include direction, length, intensity, opacity, blur, and gradient. The shadow can be hidden or shown. The shadow preferences can be saved as presets, which can be loaded and managed within this tab.
Presets - predefined shadow settings. You can use the default or create your own shadow presets.
The following shadow preferences can be modified:
- Hide/Show shadow - disables or enables dropping shadow from object.
- Type - defines type of shadow: shape gradient, linear gradient, 4 shape shadows, soft shadow.
- Horizontal angle - sets shadow direction.
- Vertical angle - sets shadow length.
- Intensity - sets shadow intensity.
- Opacity - sets shadow opacity.
- Blur - sets shadow blur.
You can see the instant text preview in the Project Preview frame on the right of the window. You can rotate the preview by grabbing the image with the mouse and moving it to any direction.
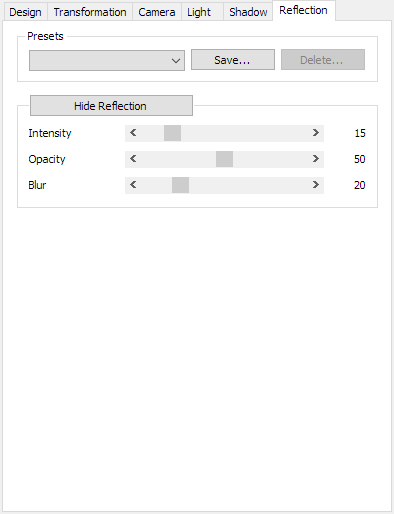
Reflection
This group of settings defines the reflection preferences, including intensity and opacity. The reflection can be hidden or shown. The reflection preferences can be saved as presets, which can be loaded and managed within this tab.
Presets - predefined reflection settings. You can use the default or create your own reflection presets.
The following reflection preferences can be modified:
- Intensity - sets reflection intensity.
- Opacity - sets reflection opacity.
- Blur - sets reflection blur.
You can see the instant text preview in the Project Preview frame on the right of the window. You can rotate the preview by grabbing the image with the mouse and moving it to any direction.
Related topics
3D Text Commander